
-
In a saucepan, cook the milk and vanilla over medium-high heat until the mixture only just comes to a boil.
-
While the milk is heating, whisk the egg yolks and sugar together in a bowl until pale, slightly fluffy and smooth.
-

Tip: This step is called ‘blanching’ – the sugar protects the egg proteins, preventing lump formation and curdling during cooking.
-
Add the cornstarch to the egg mixture and whisk well until combined and no clumps remain.
-
Pour the hot milk in a slow, thin stream into the egg-sugar mixture, whisking constantly.
Tip: It’s important that you add the hot milk slowly – this is called ‘tempering’ and it prevents the egg yolks from scrambling. If you added the boiling hot milk to the egg mixture all at once, the eggs would cook and curdle. This way, you’re slowly increasing the temperature of the egg yolks while also diluting them. This helps to achieve a perfectly silky-smooth pastry cream.
-
Return the mixture to the saucepan and cook over a high heat with constant whisking until thickened (about 1-2 minutes).
-
Remove from heat and stir in the butter, whisking well until the butter has melted and the cream is smooth and glossy.
-
Transfer the pastry cream into a bowl and cover it with a piece of cling film pressed directly on the surface of the cream to prevent a skin from forming on top. Set aside and allow to cool completely at room temperature. Don’t chill the pastry cream in the fridge.
Gluten free vanilla shortbread:
-
Note: If making the open-faced cookie version, use the shortbread ingredient quantities listed in the ingredients list to make 14 cookies.
If making the sandwich cookie version, double the shortbread ingredient quantities listed above to make 16 sandwich cookies (that is, 16 top cookies with holes + 16 bottom cookies without holes).
-
Adjust the oven rack to the middle position, pre-heat the oven to 320ºF (160ºC) and line one to two large baking sheets with parchment/baking paper.
Tip 1: If making open-faced cookies, you should be able to fit all 14 cookies on one large baking sheet.
Tip 2: If making sandwich cookies, you will bake the cookies in two batches, so you can line two baking sheets if you have them on hand. Otherwise, just re-use the same baking sheet, but make sure to cool it completely before you place the next batch of unbaked cookies onto it.
-
In a large bowl, mix the softened butter, sugar and vanilla together with a wooden spoon or rubber spatula until combined.
Tip: Don’t cream or aerate the mixture, as that can make the cookies spread out in the oven and lose their shape, which is something you want to avoid (note the absence of any raising agents for the same reason).
-
Sift in the gluten free flour blend, corn starch, xanthan gum and salt. Mix it all together until you get a fairly dry mixture – it will be very crumbly and it won’t stick together very well.
-
Add the milk and mix well until it starts coming together.
-
Give it a thorough knead (because it’s gluten free you don’t need to worry about over-working the dough!) until it comes together in a smooth ball. The cookie dough might be very slightly crumbly or crack in places, but it should hold together well.
-
Roll the dough to a thickness of about 5mm between two sheets of parchment/baking paper.
Tip: Rolling between sheets of parchment/baking paper reduces cracking and also means that you don’t need to flour your surface, which in turn eliminates the possibility of incorporating extra flour into the cookie dough.
-
If making open-faced cookies: Use a 2½ inch (6.5cm) round cookie cutter to cut out the cookies. Re-roll any scraps to make more cookies until you’ve used up all the cookie dough. You should get about 14 cookies.
Transfer them onto the lined baking sheet and bake them at 320ºF (160ºC) for about 22-24 minutes or until light golden.
Tip: The slightly lower oven temperature (compared to the more usual 350ºF/180ºC) works better here, as it gives a more even bake.
-
If making sandwich cookies: Use a 2½ inch (6.5cm) round cookie cutter to cut out the cookies. Cut out the holes from HALF of the cookies with a small 1 inch (2.5cm) round cookie cutter, the wide/bottom part of a piping tip or even a bottle cap. Re-roll any scraps to make more cookies until you’ve used up all the cookie dough. You should get about 16 top cookies (with holes) and 16 bottom cookies (without holes).
Transfer the top and bottom cookies onto separate lined baking sheets. Bake them at 320ºF (160ºC) until light golden, about 20 minutes for top cookies (with holes) and about 22-24 minutes for bottom cookies (without holes).
Tip: The slightly lower oven temperature (compared to the more usual 350ºF/180ºC) works better here, as it gives a more even bake.
-
Allow the cookies to cool on the baking sheet(s) for about 10 minutes, then transfer them to a wire cooling rack to cool completely. Set aside until needed.
Chocolate ganache:
-
Place the chopped dark chocolate into a heat-proof bowl.
-
In a saucepan over medium-high heat, cook the double/heavy cream until it only just starts boiling.
-
Pour the hot cream over the chocolate and allow to sit for 2-3 minutes, then stir together until smooth and glossy.
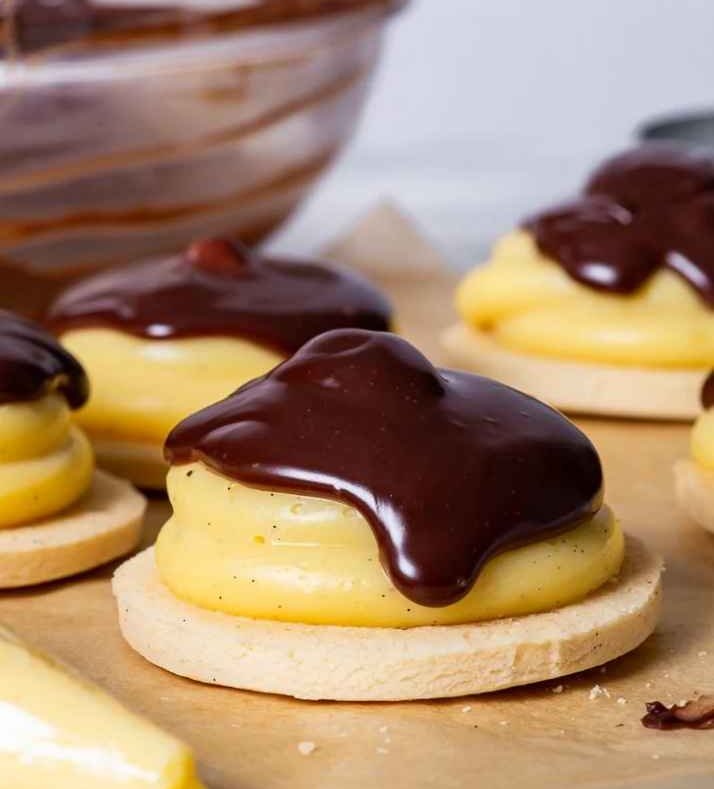
Assembly option 1 – open-faced cookies:
-
Chill the ganache in the fridge for about 15 minutes, with occasional stirring, until slightly thickened but still runny.
Tip: This chilling step ensures that the ganache will drip down the sides of the pastry cream mound very slowly and in a controlled manner.
-
Give the cooled pastry cream a good whisk to smooth it out, then transfer it into a piping bag fitted with a round piping tip (or use a piping bag with the end cut off, without a piping tip).
-
Pipe a small mound of pastry cream onto each of the 14 cookies.
-
Spoon some of the chocolate ganache on top, allowing it to gently drip down the sides of the pastry cream.
-
Chill in fridge until the ganache is set, about 15-30 minutes, before serving.
Assembly option 2 – sandwich cookies:
-
You can use the chocolate ganache straight away while it’s still very loose and runny (this will give you a thin, smooth coating on the cookies) or chill it in the fridge for about 15 minutes, with occasional stirring, until slightly thickened (this will give you a slightly uneven/wavier and more generous, thicker coating). See blog post for photos.
-
Dip the 16 top cookies (with holes) into the ganache, allowing any excess to drip away.
-
Place the ganache-dipped cookies on a baking sheet and chill them in the fridge for about 15-30 minutes until the ganache is no longer sticky/tacky to the touch. Then, freeze them for 15 minutes before the final assembly step.
Tip: Once frozen, the ganache-coated cookies will be much easier to handle when you sandwich the whole thing together.
-
Give the cooled pastry cream a good whisk to smooth it out, then transfer it into a piping bag fitted with a round piping tip (or use a piping bag with the end cut off, without a piping tip).
-
Pipe an even layer of pastry cream onto each bottom cookie (without holes).
-
Place the ganache-coated top cookies on top of the pastry cream layer and press down gently to adhere.
-
Chill in fridge for about 30 minutes before serving, to give the pastry cream some time to set.
Storage:
-
Both the open-faced and the sandwich versions of these gluten free Boston cream pie cookies keep well in a closed air-tight container in the fridge for about 3-4 days.
Tip: The cookies actually get better as they stand – while they’re amazing on the day they’re made, they become truly MAGICAL after they’ve spent the night in the fridge.
